Kinetic Windstream is one of the most popular and reliable internet providers in the US. They are mostly popular for their seamless and high-speed connection. To ensure your internet safety, you may want to change the password for the time being and it’s pretty essential.
Then the question comes, how to change wifi name and password kinetic windstream?
By logging in to the page Kinetic Windstream router, you can easily change the password and WiFi name. In today’s article, we will walk through some step-by-step procedures for changing the WiFi name and password of Kinetic Windstream. So, let’s get started!
How to Change WiFi Name and Password Kinetic Windstream?

Here we go with the simple steps you need to follow-
Step 1: Navigate The Router Configuration🌐
First, with your PC or cellphone, connect to the Kinetic Windstream WiFi network. On the connected device, launch a web browser like Chrome or Firefox.
Step 2: Enter The IP Address of Router🔍
On the browser’s address bar, type the Kinetic Windstream IP address: “192.168.254.254“. To proceed further, tap “Enter”.
Step 3: Log In
After you press enter, you will be directed to the Kinetic Windstream router login page. Then, enter the router’s username and password. Mostly, the default username is “admin” and the default password is “admin” or “password”. However, if you have a customized password or username, log in with that information. Further, click “Login” or “Submit” to enter the router settings.
Step 4: Access The Wireless Settings ⚙️
After you access the router settings, you will be directed to the router’s administration panel. Now, find the option “Wireless” or “WiFi” and click on it to successfully access the wireless settings.
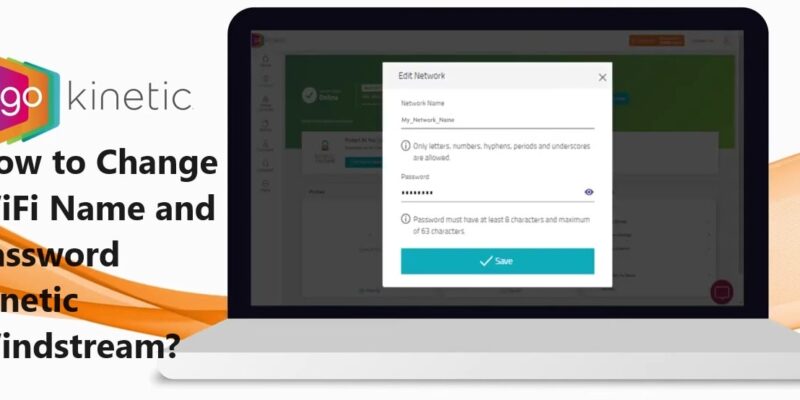
Step 5: Change The WiFi Name📶✏️
Now, try to find the “Network Name” or “SSID” in the wireless settings. Then, remove the old name and enter the new name you desire. The new name shall be unique and easily memoizable. Please avoid using personal data or information, in the username or password to protect your privacy. Click on “Apply” and “Save” for the successful changes.
Step 6: Change The Password🔒🔑
In the section of wifi settings, find the options “WiFi Password”, “Wireless Security”, “Passphrase”, “Key Entry” or “Pre-shared Key”. Then, delete the previous password and enter a strong and unique combination password.
A strong password is a combination of uppercase and lowercase letters, special characters, and numbers. Make sure to write down or add the password in your notebook for your access. Also, the password should be aimed at 12 characters to have uniqueness. To save the changed password, click on the “Save” or “Apply” button.
FAQs
How do I access my Kinetic Windstream router settings to change WiFi details?
Connect to the Kinetic Windstream WiFi, enter “192.168.254.254” in a browser, log in using default or custom credentials.
What’s the process to alter the WiFi name for Kinetic Windstream?
Log into router settings, find “Wireless” or “WiFi,” change the “Network Name” (SSID), and save.
How can I change the WiFi password for Kinetic Windstream?
Access WiFi settings, update the password with a strong combination, and save the changes.
What makes a strong WiFi password for Kinetic Windstream?
A robust password includes upper/lowercase letters, numbers, symbols, and should be at least 12 characters. Avoid personal info.
Why change the default WiFi credentials provided by Kinetic Windstream?
Changing default credentials boosts security, preventing unauthorized access and potential breaches.
Conclusion🛡️🔐
Therefore, you can see changing the Kinetic Windstream password is extremely easy with some simple steps. You must maintain the internet security of your WiFi system, so no information gets leaked.
However, that’s all for now. If you’re interested read another article I covered on – how to connect landline phone to wifi router ?